
Platformer Tutorial
In this tutorial, we will create a simple platformer. This tutorial will primarily be focused on creating the basic element of a working game using Tiled as the level editor.
Introduction
To work through this tutorial, you need the following:
- The Tiled Map Editor, installed and running (0.9.0 or later)
- The melonJS boilerplate, that we will use as default template project for our tutorial (please make sure to install the required dependencies as instructed in the README)
-
The tutorial data files, to be uncompressed inside the (here
above) template src/data directory, and which contains the following :
- a level tileset (area01_level_tiles.png)
- two backgrounds for parallax layers (background.png & clouds.png)
- some basic spritesheets (player & enemey animation spritesheet, spinning coin)
- some audio sfx and music (in both mp3 and ogg format)
- a title screen background (title_screen.png)
- The melonJS documentation for more details
Testing/debugging :
If you just want to use the filesystem, the problem is you'll run into "cross-origin request"
security errors. With Chrome, you need to use the "--disable-web-security" parameter or better
"--allow-file-access-from-files" when launching the browser. This must be done in order to test
any local content, else the browser will complain when trying to load assets through XHR.
Though this method is not recommended, since as long as you have the option
enabled, you're adding security vulnerabilities to your environmnet.
A second and easier option is to use a local web server, as for example detailed in the melonJS boilerplate README, by using the npm run dev tool, and that will allow you to test your game in your browser.
Additional Credits :
- SpicyPixel.NET for the GfxLib-Fuzed assets
- noSoapRadio for the in game music
Feel free to modify whatever you want. We also assume here, that you are already familiar with Tiled; if you need more help with the tool, you can check the Tiled homepage and wiki for further help.
Part 1: Creating a level using Tiled
Note: Before starting, and if you are new to Tiled, we strongly encourage you to read this introduction here, that provides the basic on how to get started and how the editor is working.
First let's open Tiled and create a new map : for this tutorial we will we use a 640x480 canvas, and since we have 32x32 tiles, we must specify at least 20 and 15 for the map size. In my example I'll define a 40x15 level, so we can play with scrolling background later.
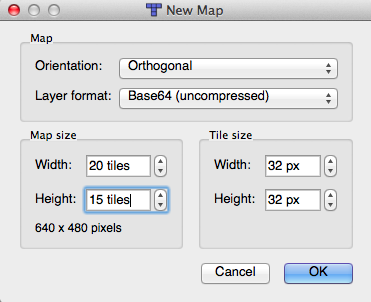
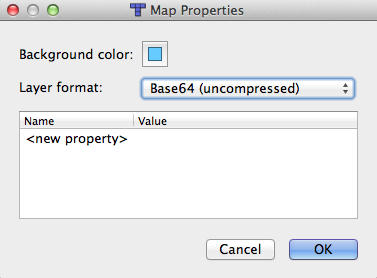
Also, as melonJS supports only uncompressed tilemaps, please be sure that your settings are correct. We do recommend the Base64 encoding, since it produces a smaller file, but it's really up to you.
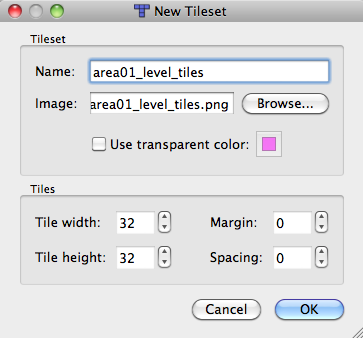
Then let's add our tileset using Map/New Tileset. Be sure to configure the tileset spacing and margin to zero in tiled.
For the beauty of it, we will create two layers - one background layer, and one foreground layer. Feel free to use your imagination and do whatever you want. I named them logically "background" and "foreground", but you can put whatever you want.
Here's what my level looked like when I finished it : 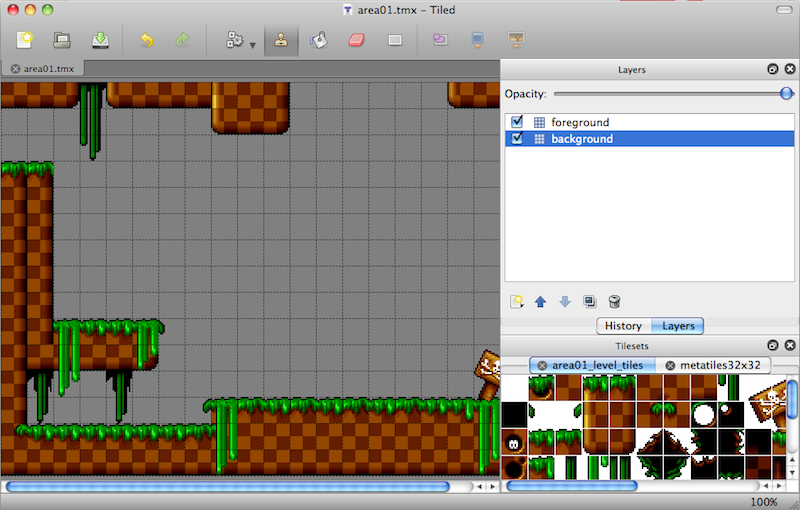
Finally, let's define a background color for our level, by using the color picker tool (Map/Map Properties), and just specify any color you prefer.
To finish, let's save our new map as "area01" under the "src/data/map/" folder, and we are done with the first step!
Part 2: Loading our level
First of all, and after unzipping the tutorial assets into the boilerplate "src/data" directory structure, you should have something like this:
src
└── data
│    ├── bgm
│    │    ├── dst-inertexponent.mp3
│    │    └── dst-inertexponent.ogg
│    ├── fnt
│    │    ├── PressStart2P.png
│    │    └── PressStart2P.fnt
|    ├── img
|    |    ├── gui
|    │    │    └──  title_screen.png
|    |    ├── map
|    │    │    └── area01_level_tiles.png
|    |    ├── sprite
|    │    │    ├── gripe_run_right.png
|    │    │    ├── spinning_coin_gold.png
|    │    │    └── wheelie_right.png
│    │    ├── background.png
│    │    └── clouds.png
|    ├── map
|    ├── sfx
│    │    ├── cling.mp3
│    │    ├── cling.ogg
│    │    ├── jump.mp3
│    │    ├── jump.ogg
│    │    ├── stomp.mp3
│    │    └── stomp.ogg
└── js
|    ├── renderables
|    └── stage
├── index.js
├── index.css
├── index.html
└── manifest.js
The boilerplate also provides a bunch of default code, but first let's have a look first at our index.js file:
import * as me from 'melonjs/dist/melonjs.module.js';

import TitleScreen from './js/stage/title.js';
import PlayScreen from './js/stage/play.js';
import PlayerEntity from "./js/renderables/player-entity.js";
import CoinEntity from "./js/renderables/coin-entity.js";
import EnemyEntity from "./js/renderables/enemy-entity.js";

import DataManifest from './manifest.js';


/* Game namespace */
me.device.onReady(() => {

    // Initialize the video.
    if (!me.video.init(640, 480, {parent : "screen", scale : "auto"})) {
        alert("Your browser does not support HTML5 canvas.");
        return;
    }

    // initialize the debug plugin in development mode.
    import('./js/plugin/debug/debugPanel.js').then((plugin) => {
        // automatically register the debug panel
        me.utils.function.defer(me.plugin.register, this, plugin.DebugPanelPlugin, "debugPanel");
    });


    // Initialize the audio.
    me.audio.init("mp3,ogg");

    // allow cross-origin for image/texture loading
    me.loader.crossOrigin = "anonymous";

    // set and load all resources.
    me.loader.preload(DataManifest, function() {
        // set the user defined game stages
        me.state.set(me.state.MENU, new TitleScreen());
        me.state.set(me.state.PLAY, new PlayScreen());


        // set a global fading transition for the screen
        me.state.transition("fade", "#FFFFFF", 250);


		// add our player entity in the entity pool
		me.pool.register("mainPlayer", PlayerEntity);
		me.pool.register("CoinEntity", CoinEntity);
		me.pool.register("EnemyEntity", EnemyEntity);


        // enable the keyboard
        me.input.bindKey(me.input.KEY.LEFT,  "left");
        me.input.bindKey(me.input.KEY.RIGHT, "right");
        // map X, Up Arrow and Space for jump
        me.input.bindKey(me.input.KEY.X,      "jump", true);
        me.input.bindKey(me.input.KEY.UP,     "jump", true);
        me.input.bindKey(me.input.KEY.SPACE,  "jump", true);

        // Start the game.
        me.state.change(me.state.MENU);
    });

});
This is very simple. Once the page is loaded, the display and audio is initialized, and set all game resources to be preloaded. Once done, we define a new state that will be used for the in game stuff, together with a PlayScreen Stage object that we will use to manage the game event (reset, etc...).
The only change we will do here for now is chaging the given video resolution for the `me.video.init()` function, as for the tutorial we will create a 640x480 canvas. Also we will change the scaleMethod to "flex-width", as it better fits with a platformer game (see the `me.video.init` documentation for further information on the various scaling mode available).
Then we need to actually add both the TMX level we created in the first step together with its tileset to the list of assets to load in the data manifest by add the two below lines to the manifest.js file (full format described here).
{name: "area01_level_tiles",  type:"image",	src: "data/img/map/area01_level_tiles.png"},
{name: "area01",              type: "tmx",	src: "data/map/area01.tmx"}
Note that although we use here directly the tmx file, for production we do recommend using the json format (that can also be exported directly from Tiled), as it gives a smaller file size, allows for much faster level loading and prevents from any server issue with the .tmx extension.
Also please do note that here we import melonJS using the 'melonjs/dist/melonjs.module.js' path, under the assumption that you use the boilerplate. If however you prefer using a CDN network for delivery you can use 'https://esm.run/melonjs' or any other format or version provided through jsDelivr
.Finally, let's open the ./js/stage/play.js file and in the onResetEvent() function (which is called on a state change), we use the level load function to display our previously preloaded level, using our default level name :
import * as me from 'melonjs/dist/melonjs.module.js';

import HUD from '../renderables/hud/container.js'
import data from '../data.js'

export default class PlayScreen extends me.Stage {

	/**
	 *  action to perform on state change
	 */
	onResetEvent() {

		// load a level
		me.level.load("area01");

		// reset the score
		data.score = 0;

		// add our HUD to the game world
		this.HUD = new HUDContainer();
		me.game.world.addChild(this.HUD);

	}


	/**
	 *  action to perform when leaving this screen (state change)
	 */
	onDestroyEvent() {
		// remove the HUD from the game world
		me.game.world.removeChild(this.HUD);
	}
}
That's all! If you did everything correctly, and open your index.html (Remember that if you don’t use a web server, you will need to allow your browser to access local files, please refer to the “Testing/debugging” at the beginning of the tutorial if required).
Try it out
(click on the image to see it running in your browser), you should see something like this
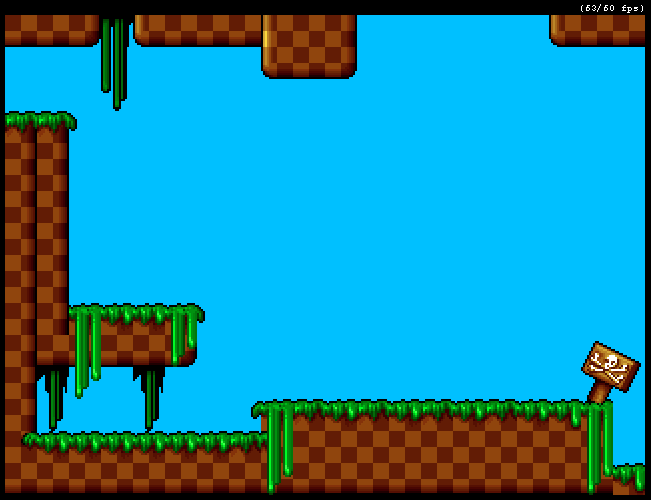
Yes, nothing fancy yet, but that's only the beginning!
Also in case you didn't notice, since we defined a 640x480 display in our application, we only see a part of the map (the half of it to be exact), which is normal. melonJS automatically creates a corresponding viewport, and we will be able to navigate through the map in the next step, when we will add a "main player"
Part 3: Add a main player
Here we will create a new object by extending the default me.Entity, to create our player. We will use the provided simple spritesheet (gripe_run_right.png) to animate our character, and define a basic walking and standing animation. It's of course possible to define more complex animations for the same entity (jumping, crouching, when hurt, etc...), but let's keep things simple for now.

Then it's time to create our entity, open the `./js/renderables/player.js` example file, and let's complete it to match with the following :
import * as me from 'melonjs/dist/melonjs.module.js';

/**
 * Player Entity
 */


export default class PlayerEntity extends me.Entity {
    /**
     *
     * @param x
     * @param y
     * @param settings
     */
    constructor(x, y, settings) {
        super(x, y, settings);


        // max walking & jumping speed
        this.body.setMaxVelocity(3, 15);
        this.body.setFriction(0.4, 0);

        // set the display to follow our position on both axis
        me.game.viewport.follow(this.pos, me.game.viewport.AXIS.BOTH, 0.4);

        // ensure the player is updated even when outside of the viewport
        this.alwaysUpdate = true;

        // define a basic walking animation (using all frames)
        this.renderable.addAnimation("walk",  [0, 1, 2, 3, 4, 5, 6, 7]);

        // define a standing animation (using the first frame)
        this.renderable.addAnimation("stand",  [0]);

        // set the standing animation as default
        this.renderable.setCurrentAnimation("stand");
    }

    /**
     * Update the Entity
     *
     * @param dt
     * @returns {any|boolean}
     */
    update(dt) {
        if (me.input.isKeyPressed('left')) {

            // flip the sprite on horizontal axis
            this.renderable.flipX(true);
            // update the default force
            this.body.force.x = -this.body.maxVel.x;
            // change to the walking animation
            if (!this.renderable.isCurrentAnimation("walk")) {
                this.renderable.setCurrentAnimation("walk");
            }
        } else if (me.input.isKeyPressed('right')) {

            // unflip the sprite
            this.renderable.flipX(false);
            // update the entity velocity
            this.body.force.x = this.body.maxVel.x;
            // change to the walking animation
            if (!this.renderable.isCurrentAnimation("walk")) {
                this.renderable.setCurrentAnimation("walk");
            }
        } else {
            // change to the standing animation
            this.renderable.setCurrentAnimation("stand");
        }

        if (me.input.isKeyPressed('jump')) {

            if (!this.body.jumping && !this.body.falling)
            {
                // set current vel to the maximum defined value
                // gravity will then do the rest
                this.body.force.y = -this.body.maxVel.y
            }
        } else {
            this.body.force.y = 0;
        }


        return (super.update(dt) || this.body.vel.x !== 0 || this.body.vel.y !== 0);
    }

    /**
     * Collision Handler
     *
     * @returns {boolean}
     */
    onCollision() {
        return true;
    }
}
I think the above code is quite easy to understand. Basically, we extend the Entity, configure the default player speed, tweak the camera, test if some keys are pressed and manage our player movement (by setting the player speed). Also, you may notice that I'm testing the final velocity (this.body.vel.x and this.body.vel.y) of my object, which allows me to know if my object actually moved, and control if I want the sprite animation to run or not.
Then, although the default game.PlayerEntity is already declare in the boilerplate, we have to modify our "main" to actually declare our new entity in the object pool (that is used by the engine to instantiate object), and finally to map the keys we will use for the player movement. So our loaded() function will become:
// Run on game resources loaded.
loaded() {
        me.state.set(me.state.MENU, new TitleScreen());
        me.state.set(me.state.PLAY, new PlayScreen());

		// add our player entity in the entity pool
		me.pool.register("mainPlayer", PlayerEntity);

        // enable the keyboard
        me.input.bindKey(me.input.KEY.LEFT,  "left");
        me.input.bindKey(me.input.KEY.RIGHT, "right");
        // map X, Up Arrow and Space for jump
        me.input.bindKey(me.input.KEY.X,      "jump", true);
        me.input.bindKey(me.input.KEY.UP,     "jump", true);
        me.input.bindKey(me.input.KEY.SPACE,  "jump", true);

        // Start the game.
        me.state.change(me.state.PLAY);
    }
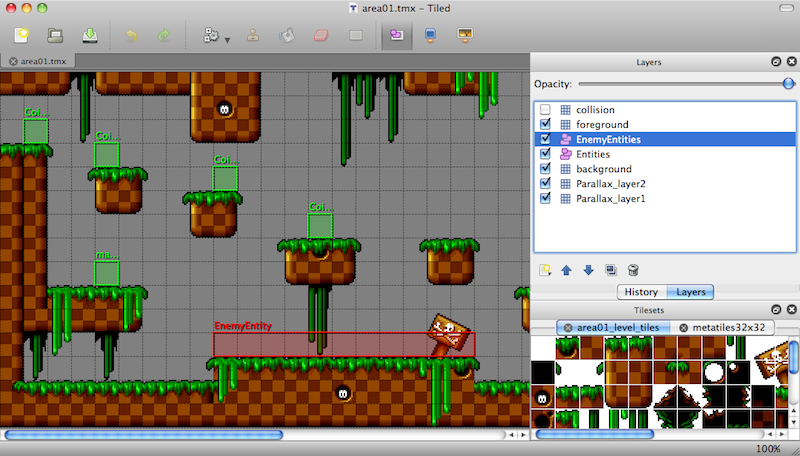
And now we can add our entity into the level! Go back to Tiled, add a new Object Layer, and finally a new Entity. To create a new Entity use the "Insert Rectangle" Tool to add a rectangle to the object layer, then you can right click the object and add the properties below.
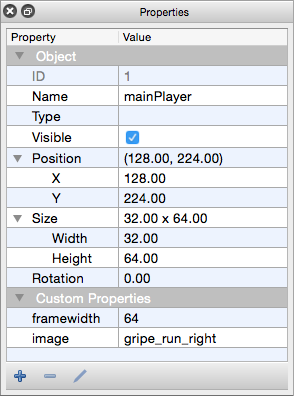
Name it (case does not matter) mainPlayer (or using the same name you used when registering our Object into the Object Pool), and add two properties to the Object:
- image : with the gripe_run_right value (name of our resource
- framewidth : with the value 64 which is the size of a single sprite in the spritesheet
- frameheight : we don't define this value here since we use a single line spritesheet, and since in this case the engine will take the actual image height as a value for it.
These two parameters will be passed as settings parameters (to the constructor) when the object will be created. Now you can either specify these fields here in Tiled, or directly in your code (when dealing with multiple objects, it can be easier to just specify the name in Tiled, and manage the rest in the constructor directly).
Note: You also free to add as many properties as you want, they will all be available in the settings object passed to your constructor.
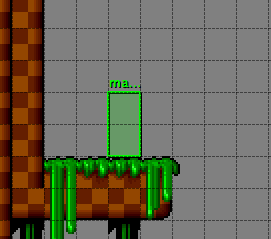
Once the object is created just positionate your entity in the level, and as in the below example make sure you are also resizing the object rectangle in Tiled to match with your actual sprite size.
Define the collision layer
We are almost done! The last step is to define the collision layer. For this we simply need to create a new object layer named "collision" and add some basic shapes to it. That's all it takes!
So now add a new Object Group Layer. This layer's name MUST contain the keyword "collision" for the engine to recognize it as a collision object layer.
Once the layer is added, select it, and just "draw" your level collision map by adding any shape using the object toolbar

Please note that melonJS implements collision detection using the Separating Axis Theorem algorithm. All polygons used for collision are required to be convex with all vertices defined with clockwise winding. A polygon is convex when all line segments connecting two points in the interior do not cross any edge of the polygon (which means that all angles are less than 180 degrees), as shown here below:
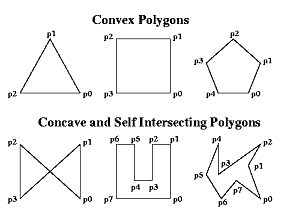
A polygon's "winding" is clockwise iff its vertices (points) are declared turning to the right (Secondary note: The image above shows COUNTERCLOCKWISE winding.)
Also if you need complex shapes to specify the parimeter of the environment, then it is recommended to use separate line segments. Lines can also be used for example when defining platform or wall elements, where you only need a specific side of the object to be collidable
Try it out
Save everything, and if you now re-open your index.html, you should see something like this: (click on the image to see it running in your browser)
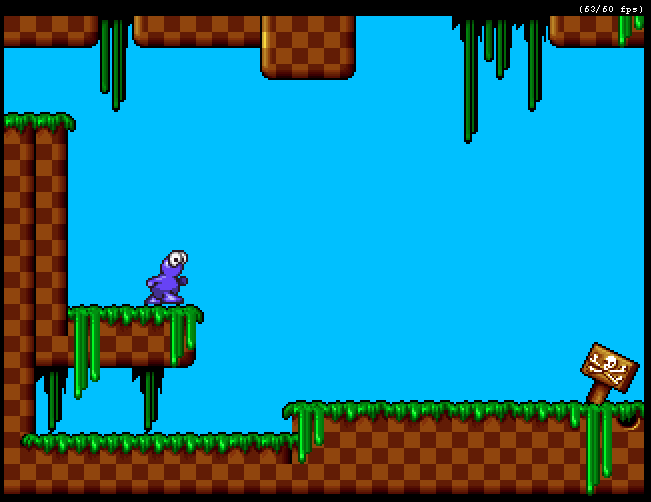
You will also notice that the display is automatically following our player, scrolling the environment.
One last thing - when creating an object, a default collision shape is automatically created to manage collision between objects, based on the object size you defined in Tiled. For debugging purposes, you can enable the debug panel by adding #debug to URL in the browser URL bar.
If you reload the game, and enable "hitbox" you will see this:
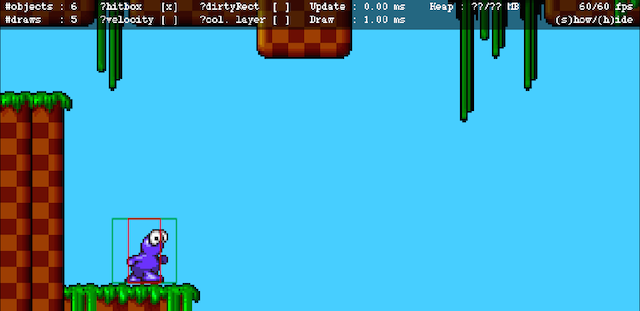
The collision box can be adjusted from Tiled by changing the size of the object and match the above example. (Collision Shape can also manually adjusted by accessing the entity body shapes property).
Note : When using the debug Panel, the sprite border is drawn in green, the defined collision shape(s) is/are drawn in red, and if you use something else/more than a rectangular collision shape, you should also see an orange box that is corresponding to the smallest rectangle containing all the defined collision shapes (and also called the entity body bounding box).
Part 4: Add a scrolling background
This one is very easy. We don't even have to add a single line of code, since everything is done through Tiled.
First, remove the background color that we added previously at the end of Part 1. (to do so, you will need to text edit the TMX file and remove the `backgroundcolor` property). Since the background will be filled with our scrolling layers, we don't need the display to be cleared with a specific color (furthermore it will save some precious frames).
Then we will use the two following backgrounds:
src/data/img/background.png for the first background layer

src/data/img/clouds.png for the second background layer
Open Tiled, and add two new Image Layers, name them to whatever you like and make sure to adjust correctly the layer order (the display order being from bottom to top)
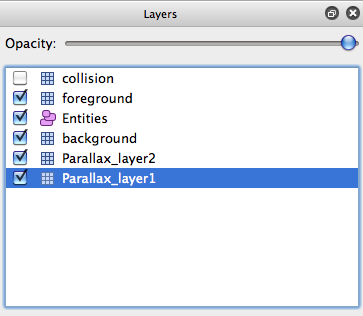
Now right-click the layers to define their properties and set the following property :
- Click the browse button and select the background.png image for the first layer (Parallax_layer1 on the picture)
- Do this again for the second layer (Parallax_layer2) with the clouds.png image
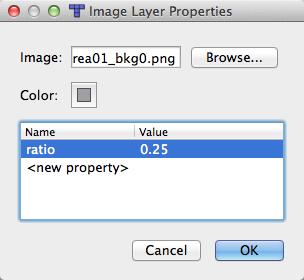
And finally add a ratio property to specify the scrolling speed of each layer : we will specify the 0.25 value for the first layer (Parallax_layer1 on the picture) and the 0.35 value for the second (keep in mind that the smaller the ratio is, the slower the scrolling speed will be).
Note that default behavior for Image Layer is to be automatically repeated on both x and y axis, which is exactly what we want here to create the parallax effect.
Try it out
"Et voila!". If you now open your index.html, you should see:
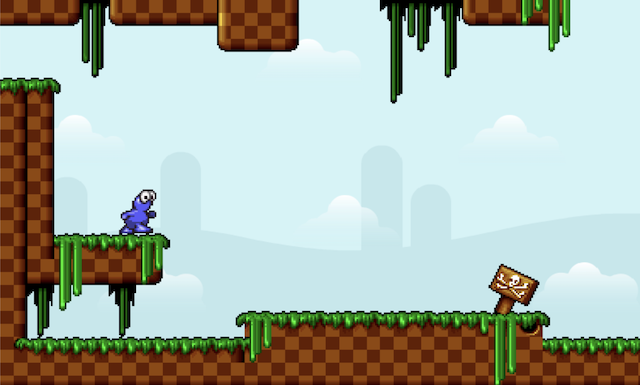
Play around with your player, and enjoy the view :)
Part 5: Adding some basic objects and enemies
In this part we will add a collectible coin (that we will use later to add to our score), using the spinning_coin_gold.png spritesheet:

And a basic enemy, using the wheelie_right.png spritesheet:

First, we need to tell MelonJS that our PlayerEntity class has the collisionType of PLAYER_OBJECT. Second, we need to rearrange our exports so that we have three entities in the file.
In a real environment, you would have one class per file. This is a tutorial, so we're just doing it quick (and wrong!)
//... in entities.js

let entities = {};

// allow `import {PlayerEntity} from './entities.js'`
export class PlayerEntity extends me.Entity {
    constructor(x, y, settings) {
        super(x, y, settings);

        // ...

        // we need to tell the game that this is a PLAYER_OBJECT, now that there are other entities that can collide
        // with a player
        this.body.collisionType = me.collision.types.PLAYER_OBJECT;

        // ...
    }

    // ...
}
entities.PlayerEntity = PlayerEntity;

// ...
// export all the entities on the object for convenience.
// import entities from './entities.js'
export default entities;
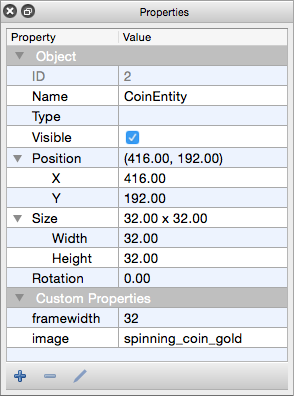
The coin itself is pretty easy; we just extend the me.Collectable. Actually, we could directly use it in Tiled (without needing to create CoinEntity here), but since we will add some score and some audio sfx later when the coin is collected, let's do it directly this way.
export class CoinEntity extends me.Collectable {
    // extending the init function is not mandatory
    // unless you need to add some extra initialization
    constructor(x, y, settings) {
        // call the parent constructor
        super(x, y , settings);

        // this item collides ONLY with PLAYER_OBJECT
        this.body.setCollisionMask(me.collision.types.PLAYER_OBJECT);
    }

    // this function is called by the engine, when
    // an object is touched by something (here collected)
    onCollision(response, other) {
        // do something when collected

        // make sure it cannot be collected "again"
        this.body.setCollisionMask(me.collision.types.NO_OBJECT);

        // remove it
        me.game.world.removeChild(this);

        return false
    }
}
entities.CoinEntity = CoinEntity;
Also, just to be sure it's clear for you that both ways of doing this is possible, we will define the Coin object properties directly in Tiled, so we don't need to add anything else in the constructor for now:
For our enemy, it's a bit longer, and (just for the exercise) we are gonna do things a bit differently this time by using a me.Sprite as a base object and add a physic body to it "manually" :
export class EnemyEntity extends me.Sprite {
    /**
     *
     * @param x
     * @param y
     * @param settings
     */
    constructor(x, y, settings) {
        // save the area size as defined in Tiled
        let width = settings.width;

        // define this here instead of tiled
        settings.image = "wheelie_right";

        // adjust the size setting information to match the sprite size
        // so that the entity object is created with the right size
        settings.framewidth = settings.width = 64;
        settings.frameheight = settings.height = 64;

        // call the parent constructor
        super(x, y , settings);

        // add a physic body
        this.body = new me.Body(this);
        // add a default collision shape
        this.body.addShape(new me.Rect(0, 0, this.width, this.height));
        // configure max speed and friction
        this.body.setMaxVelocity(4, 6);
        this.body.setFriction(0.4, 0);
        // enable physic collision (off by default for basic me.Renderable)
        this.isKinematic = false;

        // set start/end position based on the initial area size
        x = this.pos.x;
        this.startX = x;
        this.pos.x = this.endX = x + width - this.width;
        //this.pos.x  = x + width - this.width;

        // to remember which side we were walking
        this.walkLeft = false;

        // make it "alive"
        this.alive = true;
    }


    // manage the enemy movement
    update(dt) {
        if (this.alive)
        {
            if (this.walkLeft === true) {
                if (this.pos.x <= this.startX) {
                    // if reach start position
                    this.walkLeft = false;
                    this.flipX(false);
                } else {
                    this.body.force.x = -this.body.maxVel.x;
                }
            }

            if (this.walkLeft === false) {
                if (this.pos.x >= this.endX) {
                    // if reach the end position
                    this.walkLeft = true;
                    this.flipX(true);
                } else {
                    this.body.force.x = this.body.maxVel.x;
                }
            }
        }

        // return true if we moved or if the renderable was updated
        return (super.update(dt) || this.body.vel.x !== 0 || this.body.vel.y !== 0);
    }

    /**
     * colision handler
     * (called when colliding with other objects)
     */
    onCollision(response, other) {
        if (response.b.body.collisionType !== me.collision.types.WORLD_SHAPE) {
            // res.y >0 means touched by something on the bottom
            // which mean at top position for this one
            if (this.alive && (response.overlapV.y > 0) && response.a.body.falling) {
                this.flicker(750, () => {
                    me.game.world.removeChild(this);
                });
            }
            return false;
        }
        // Make all other objects solid
        return true;
    }
}
entities.EnemyEntity = EnemyEntity;
As you can see here, I specified the settings.image and settings.framewidth properties in the constructor directly, meaning that in Tiled, I won't have to add these properties to my Object (Once again, it's up to you to decide how to use it).
Also, I am using the width property given by Tiled to specify a path on which this enemy will run. Finally, in the onCollision method, I make the enemy flicker if something is jumping on top of it.
Note. This me.Sprite extends me.Renderable class, so you can use the this.flicker(750) method directly.
Then again, we add these new objects in the Object Pool
// register our object entities in the object pool
me.pool.register("mainPlayer", PlayerEntity);
me.pool.register("CoinEntity", CoinEntity);
me.pool.register("EnemyEntity", EnemyEntity);
And we are ready to complete our level in Tiled. Create a new object layer, and use the Insert Object tool to add coins and enemies where you want. Right-click on each object and make sure to set their name to either CoinEntity or EnemyEntity.
/**
 * update the player pos
 */
update(dt) {
    if (me.input.isKeyPressed('left')) {

        // flip the sprite on horizontal axis
        this.renderable.flipX(true);
        // update the default force
        this.body.force.x = -this.body.maxVel.x;
        // change to the walking animation
        if (!this.renderable.isCurrentAnimation("walk")) {
            this.renderable.setCurrentAnimation("walk");
        }
    } else if (me.input.isKeyPressed('right')) {

        // unflip the sprite
        this.renderable.flipX(false);
        // update the entity velocity
        this.body.force.x = this.body.maxVel.x;
        // change to the walking animation
        if (!this.renderable.isCurrentAnimation("walk")) {
            this.renderable.setCurrentAnimation("walk");
        }
    } else {
        // change to the standing animation
        this.renderable.setCurrentAnimation("stand");
    }

    if (me.input.isKeyPressed('jump')) {

        if (!this.body.jumping && !this.body.falling)
        {
            // set current vel to the maximum defined value
            // gravity will then do the rest
            this.body.force.y = -this.body.maxVel.y
        }
    } else {
        this.body.force.y = 0;
    }


    return (super.update(dt) || this.body.vel.x !== 0 || this.body.vel.y !== 0);
}
Last but not least, as we added some platform in our level, let's modify the onCollision handler to add a custom behavior for the "WORLD_SHAPE" type and simulate a "platform" element, as shown below.
Do note that the particular collision shapes that we do want to act as "platforms" are here identified by setting their type property to "platform" in Tiled (Feel free to use whatever you need, as far as you use the same value on both ends).
/**
 * collision handler
 */
onCollision(response, other) {
  switch (response.b.body.collisionType) {
    case me.collision.types.WORLD_SHAPE:
      // Simulate a platform object
      if (other.type === "platform") {
        if (this.body.falling &&
          !me.input.isKeyPressed('down') &&

          // Shortest overlap would move the player upward
          (response.overlapV.y > 0) &&

          // The velocity is reasonably fast enough to have penetrated to the overlap depth
          (~~this.body.vel.y >= ~~response.overlapV.y)
        ) {
          // Disable collision on the x axis
          response.overlapV.x = 0;

          // Repond to the platform (it is solid)
          return true;
        }

        // Do not respond to the platform (pass through)
        return false;
      }
      break;

    case me.collision.types.ENEMY_OBJECT:
      if ((response.overlapV.y>0) && this.body.falling) {
        // bounce (force jump)
        this.body.vel.y = -this.body.maxVel.y;
      }
      else {
        // let's flicker in case we touched an enemy
        this.renderable.flicker(750);
      }

      // Fall through

    default:
      // Do not respond to other objects (e.g. coins)
      return false;
  }

  // Make the object solid
  return true;
}
Try it out
And this is what you should get (note that I completed the level a little bit, adding platforms, etc...):
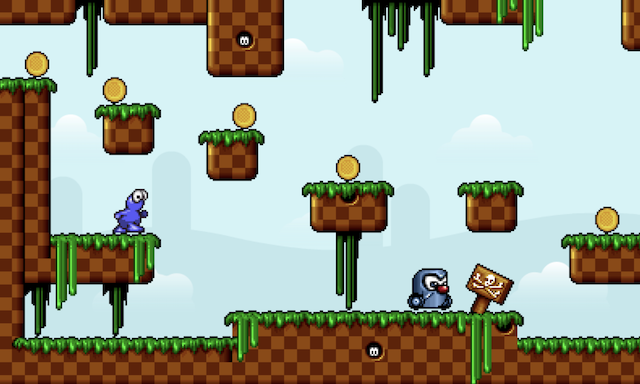
Try to collect your coins, avoid the enemy or jump on it!
Part 6: Adding some basic HUD information
It's time to display some score when we collect those coins.
We will use a bitmap font to display our score ! For the sake of convenience we are providing both the required bitmap and data information, but generating the required files by yourself is quite simple, just follow the small how-to here
Under the `data\fnt` folder you will find two files : a .PNG (the actual texture) and a .FNT (the font definition file), and the font example we provide is named "PressStart2P", we just need to add the following line to your existing assets lists to preload them :
// game font
{ name: "PressStart2P", type:"image", src: "data/fnt/PressStart2P.png" },
{ name: "PressStart2P", type:"binary", src: "data/fnt/PressStart2P.fnt"},
The boilerplate we used earlier already contains a HUD Skeleton that we will use as a base for our game. The skeleton is quite simple and consist of:
- an object called gHUDContainer, that inherits from me.Container
- a basic score object called game.HUD.ScoreItem, that inherits from me.Renderable
The HUD container is just basically an object container, that is defined as persistent (so that it can survive level changes), displayed on top of all others object (z propery set to Infinity), and we also make it non collidable so that it just be ignored during collision check.
The Score Object is defined as floating (so that when we add it to our HUD container we use screen coordinates) and just for now caches the score value (defined under game.data).
import * as me from 'melonjs/dist/melonjs.module.js';
import ScoreItem from "./score-item.js";


export default class HUDContainer extends me.Container {
    constructor() {
        super();

        // persistent across level change
        this.isPersistent = true;

        // make sure we use screen coordinates
        this.floating = true;

        // give a name
        this.name = "HUD";

        // add our child score object at the top left corner
        this.addChild(new ScoreItem(5, 5));
    }
}
import * as me from 'melonjs/dist/melonjs.module.js';
import data from './../../data.js'


export default class ScoreItem extends me.Renderable {
    /**
     *
     * @param x
     * @param y
     */
    constructor(x, y) {
        super(x, y, 10, 10);


        // create the font object
        this.font = new me.BitmapText(0, 0, {font: "PressStart2P"});

        // font alignment to right, bottom
        this.font.textAlign = "right";
        this.font.textBaseline = "bottom";

        // local copy of the global score
        this.score = -1;
    }

    /**
     *
     * @returns {boolean}
     */
    update() {
        // we don't do anything fancy here, so just
        // return true if the score has been updated
        if (this.score !== data.score) {
            this.score = data.score;
            return true;
        }

        return false;
    }


    /**
     * draw the score
     */
    draw(renderer) {
        this.font.draw (renderer, data.score, me.game.viewport.width + this.pos.x, me.game.viewport.height + this.pos.y);
    }
}
Now let's display our current score ! For that we will just simply complete the given ScoreItem object, by creating a local font property (using the previously bitmap font), and simply draw the score using our bitmap font :
/**
 * Code to draw the score to the HUD
 */

export class ScoreItem extends me.Renderable {
	/**
	 *
	 * @param x
	 * @param y
	 */
	constructor(x, y) {
		super(x, y, 10, 10);


		// create the font object
		this.font = new me.BitmapText(0, 0, {font: "PressStart2P"});

		// font alignment to right, bottom
		this.font.textAlign = "right";
		this.font.textBaseline = "bottom";

		// local copy of the global score
		this.score = -1;
	}

	/**
	 *
	 * @returns {boolean}
	 */
	update() {
		// we don't do anything fancy here, so just
		// return true if the score has been updated
		if (this.score !== data.score) {
			this.score = data.score;
			return true;
		}
		return false;
	}


	/**
	 * draw the score
	 */
	draw(renderer) {
		this.font.draw (renderer, data.score, me.game.viewport.width + this.pos.x, me.game.viewport.height + this.pos.y);
	}
}
HUD.ScoreItem = ScoreItem;
The HUD is already added and removed when we start the game, so there is nothing to do here. Note also that we are adding the HUD to the game world after loading the level, as me.Container objects are by default automatically seting the z value (through the autoDepth feature) this will ensure that the HUD is correctly displayed on top of the rest.
export default class PlayScreen extends me.Stage {

	/**
	 *  action to perform on state change
	 */
	onResetEvent() {

		// load a level
		me.level.load("area01");

		// reset the score
		data.score = 0;

		// add our HUD to the game world
		this.HUD = new HUD.Container();
		me.game.world.addChild(this.HUD);

	}


	/**
	 *  action to perform when leaving this screen (state change)
	 */
	onDestroyEvent() {
		// remove the HUD from the game world
		me.game.world.removeChild(this.HUD);
	}
}
Last step is of course to actually change the score when a coin is collected ! Now let's modify our Coin Object:
onCollision() {
  // do something when collected

  // give some score
  data.score += 250;

  // make sure it cannot be collected "again"
  this.body.setCollisionMask(me.collision.types.NO_OBJECT);

  // remove it
  me.game.world.removeChild(this);
}
As you can see, in the onCollision function, we just change our game.data.score property by adding some value to it, then we ensure the object cannot be collected again, and remove the coin
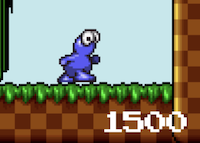
Try it out
We can now check the result, and we should now have our score displayed in the bottom-right corner of the screen:
Part 7: Adding some audio
In this section we will add some audio to our game:
- a sound when collecting a coin
- a sound when jumping
- a sound when stomping on enemy
- a background (or in game music)
If we take a look back on how we first initialized the audio, you can see that we passed the "mp3,ogg" parameter to the initialization function, to indicate that we will provide two audio files format, one as mp3, and one as ogg melonJS will then use the right based on your browser capabilities.
// initialize the "audio"
me.audio.init("mp3,ogg");
Now let's modify our game :
Collecting a coin
In the CoinEntity code, where we previously managed our earned points, we just need to add a new call to me.audio.play() and use the "cling" audio resource. that's all!
onCollision() {
  // do something when collected

  // play a "coin collected" sound
  me.audio.play("cling");

  // give some score
  game.data.score += 250;

  // make sure it cannot be collected "again"
  this.body.setCollisionMask(me.collision.types.NO_OBJECT);

  // remove it
  me.game.world.removeChild(this);
}
Jumping
In the update() function of the mainPlayer, we also add a call to me.audio.play() and use the "jump" audio resource. You can also note that I added a test on the return value of doJump(). doJump can return false in case you are not allowed to jump (already jumping, etc..) and in that case there is no need to play the sound sfx.
if (me.input.isKeyPressed('jump')) {
  if (!this.body.jumping && !this.body.falling) {
    // set current vel to the maximum defined value
    // gravity will then do the rest
    this.body.vel.y = -this.body.maxVel.y;

    // play some audio
    me.audio.play("jump");
  }
}
Stomping
And still the same for this one, but using the "stomp" resource, this time in the collision handler function of the mainPlayer:
/**
 * collision handler
 */
onCollision(response, other) {

      // ...

      case me.collision.types.ENEMY_OBJECT:
        if ((response.overlapV.y>0) && this.body.falling) {
          // bounce (force jump)
          this.body.vel.y = -this.body.maxVel.y;

          // play some audio
          me.audio.play("stomp");
        }
        else {
          // let's flicker in case we touched an enemy
          this.renderable.flicker(750);
        }

        // Fall through

      default:
        // Do not respond to other objects (e.g. coins)
        return false;
    }

  // Make the object solid
  return true;
}
In-game music
In our main, in the onResetEvent() function, we just add a call to the me.audio.playTrack() function, specifying the audio track to be used:
onResetEvent() {
  // play the audio track
  me.audio.playTrack("dst-inertexponent");

  // ...
},
And we also need to modify the onDestroyEvent() function to stop the current track when exiting the game:
onDestroyEvent() {

  // ...

  // stop the current audio track
  me.audio.stopTrack();
}
That's all! click here to see the final result.
Part 8: Adding a second level
You should know how to create a level now. However, here I will show you how to go to another level.
To do this, melonJS has an Object named me.Trigger, that we will add to the Entities layer in Tiled and specify what to do when our main player hit it :
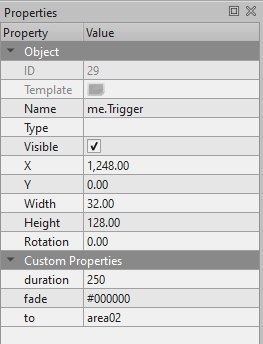
Assuming that our new level is called "area02", we just need to add a "to" property with
"area02" for the value. So that when our player will hit the Object, the engine will
automatically load the "area02" level.
Optionally we can also ask the engine to add a
fadeOut/fadeIn effect when changing level by adding the "fade" color and "duration"
(in ms) properties (as in the image)
click here to see the final result.
Part 9: Adding a title screen
To finish, let's add a title screen to our game, using the title_screen.png files in the "src/data/img/gui/" folder (and of course to be added in the resource list, as we done it previously for other images):
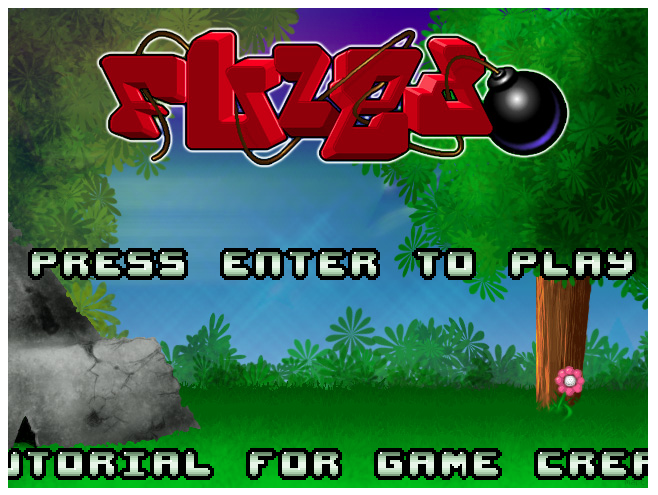
and on top of it we will add some message, and wait for the user input to start the game!
First let's declare a new Object, extending me.Stage:
/**
 * A title screen
 */
export default class TitleScreen extends me.Stage {
  // reset function
  onResetEvent() {
    // ...
  },

  // destroy function
  onDestroyEvent() {
    // ...
  }
};
So now we want to:
- display the above background image
- add some text to the center of the screen ("Press enter to play")
- wait for user input (pressing enter)
Additionally, I also want to add a small scrolling text about this tutorial.
export default class TitleScreen extends me.Stage {

	onResetEvent() {

		// new sprite for the title screen, position at the center of the game viewport
		var backgroundImage = new me.Sprite(me.game.viewport.width / 2, me.game.viewport.height / 2, {
				image: me.loader.getImage('title_screen'),
			}
		);

		// scale to fit with the viewport size
		backgroundImage.scale(me.game.viewport.width / backgroundImage.width, me.game.viewport.height / backgroundImage.height);

		// add to the world container
		me.game.world.addChild(backgroundImage, 1);

		me.game.world.addChild(new TitleText());

		// change to play state on press Enter or click/tap
		me.input.bindKey(me.input.KEY.ENTER, "enter", true);
		me.input.bindPointer(me.input.pointer.LEFT, me.input.KEY.ENTER);

		this.handler = me.event.on(me.event.KEYDOWN, function (action, keyCode, edge) {
			if (action === "enter") {
				// play something on tap / enter
				// this will unlock audio on mobile devices
				me.audio.play("cling");
				me.state.change(me.state.PLAY);
			}
		});
	}

	/**
	 * action to perform when leaving this screen (state change)
	 */
	onDestroyEvent() {
		me.input.unbindKey(me.input.KEY.ENTER);
		me.input.unbindPointer(me.input.pointer.LEFT);
		me.event.off(me.event.KEYDOWN, this.handler);
	}
}
What do we have above?
- 1) In the onResetEvent function, we create two renderables components and add them to our game world. The first is a Sprite object that will display our title background image, and the second handles the "press ENTER" message and a scroller based on a Tween object. Note: Concerning the font, if you check carefully the corresponding asset (PressStart2P.png), you will notice that it only contains uppercase letters, so be sure as well to only use uppercase letter in your text.
- 2) We also register to key event, or mouse/tap event to automatically switch to the PLAY state if pressed.
- 3) On destroy, we unbind the key and pointer events.
And of course the very last thing is to indicate to the engine we created a new object and associate it to the corresponding state (here, MENU). Also, using the transition function of me.state, I'm telling the engine to add a fading effect between state changes.
Finally, instead of switching to the PLAY state at the end of the loaded function, I'm
switching now to the MENU state:
/*
 * callback when everything is loaded
 */
loaded() {
  // set the "Play/Ingame" Screen Object
  me.state.set(me.state.MENU, new game.TitleScreen());

  // set the "Play/Ingame" Screen Object
  me.state.set(me.state.PLAY, new game.PlayScreen());

  // set a global fading transition for the screen
  me.state.transition("fade", "#FFFFFF", 250);

  // register our player entity in the object pool
  me.pool.register("mainPlayer", Entities.PlayerEntity);
  me.pool.register("CoinEntity", Entities.CoinEntity);
  me.pool.register("EnemyEntity", Entities.EnemyEntity);

  // enable the keyboard
  me.input.bindKey(me.input.KEY.LEFT, "left");
  me.input.bindKey(me.input.KEY.RIGHT, "right");
  me.input.bindKey(me.input.KEY.X, "jump", true);

  // display the menu title
  me.state.change(me.state.MENU);
}
Try it out
Congratulations! You reached the end of this tutorial, time to test it, and you should have something like this:
Part 10: Conclusion
Well, we hope that you enjoyed our time spent together with this little introduction of melonJS, and you can now explore how to go further by yourself. This is an important part of programming and game development.
If you get stuck on any of the challenges or parts of the tutorial, please search for the problem, or ask us the question on discord
Never forget that this is all for fun, so have fun!
If you get stuck, just open the "tutorial_stepz_refactored" folder found in this source code.
The Refactored Source Code